INTRODUCTION
Making your own compost is a fantastic way to improve the quality of your existing soil, gives you a steady supply of fantastic potting material for planting up containers and saves you a lot of money by removing the need to purchase huge bags of it from your usual gardening store.
However, there is often a lot of confusion around the actual process of composting, and many people that are keen on making their own get lost along the way and give up altogether. There is also a common misconception that composting smells bad or is dirty, and this is another reason why some people choose to shy away from it.
That’s why we’ve put together this ultimate guide to composting! Not only will we take you through how to create your own nutrient-filled compost, but we’ve also got the answers to any questions you might have, and will hopefully give you the confidence to start composting at home.
WHAT IS COMPOSTING?
Let’s start with the basics – what exactly is composting? Put simply, it’s the process of breaking down organic materials such as garden waste and certain kitchen scraps over time through naturally occurring bacteria, fungi and microorganisms, and turning them into the very same compost you can find being sold in garden stores.
Plants absolutely love compost not only for it’s nutritional value but also for it’s crumbly consistency that allows their roots to move through the earth with more ease. It’s also fantastic for retaining moisture and can greatly improve certain soil conditions (such as heavy clay) by giving it a better structure over time.
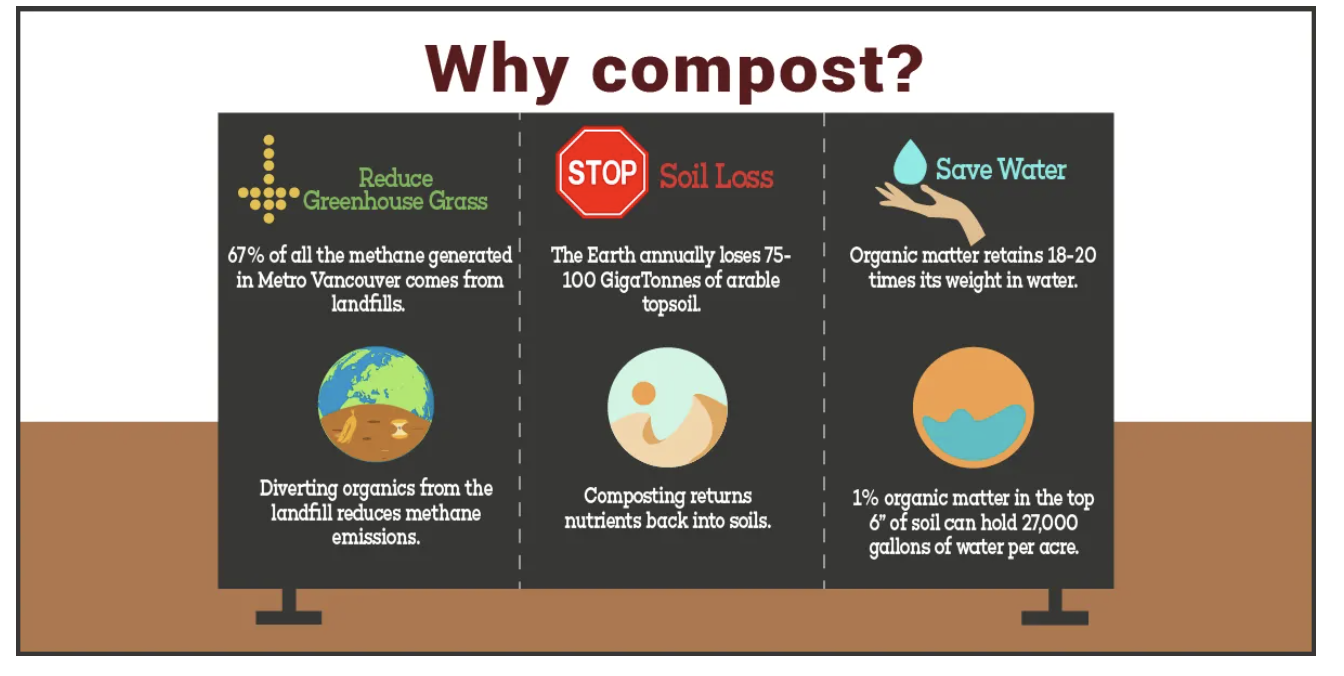
Without a doubt, adding homemade compost to your garden is on the most beneficial things you can do for it. In fact, it’s so revered for it’s nutritional value and soil improvement qualities that it is often referred to as ‘Black Gold’ within the gardening community.
It’s also a super environmentally friendly way of reducing your household waste and putting the nutrients found in vegetable peelings, plant prunings and grass clippings that would ordinarily be wasted straight back into your garden.
The environmentally friendly benefits of composting reach way beyond your household as well, and by creating your own compost you’ll have less of a need for garden waste removal trucks to visit your home, reducing your carbon footprint even further. You can work out your carbon footprint with this carbon footprint calculator.
HOW COMPOSTING WORKS
Essentially, composting is a way of recreating the same decaying process that occurs in nature, just within a confined space instead.
During the composting process, the microorganisms that are present in the soil eat the organic matter that you place into your compost bin, feeding on the carbon within them and breaking it down into it’s simplest form. This then produces a fibre rich humus that contains loads of carbon as well as inorganic nutrients such as nitrogen, phosphorus and potassium.
It’s a symbiotic relationship between you and the microorganisms that live in your compost bin. You provide them with the food they need and, in turn, they turn that food into nutrient-rich compost that you can then use in your garden.
The process of composting is broken down into three different stages, the first of which actually only lasts for a couple of days. During this initial stage, the mesophilic microorganisms (those that thrive in temperatures between 68ºF – 113ºF) begin to physically breakdown the organic material, all the while increasing the temperature within the compost pile through their activity.
During the second stage the mesophilic microorganisms continue to breakdown the organic material, whilst thermophilic microorganisms (those that can survive temperatures exceeding 113ºF) also get to work. This means that the temperatures inside your compost bin begin to soar, so it’s at this stage that you need to get involved yourself and aerate your compost to provide oxygen for the mesophilic microorganisms.
We’ll go into more detail on this a little later on, however this is a really important step otherwise the increased temperatures could kill off the beneficial bacteria in your compost bin altogether.
The third and final stage of composting is the longest, and typically lasts for several months. This begins when the thermophilic microorganisms have used up most of the available supply of organic compounds, and the temperature begins to drop enough for the mesophilic organisms to take back control. This then gives them the opportunity to finish breaking down the organic matter into a nutrient-rich humus that is then ready to use in your garden.
HOW TO START COMPOSTING

The actual process of composting is incredibly simple, and below we’ll take you through step by step on how to create and care for your compost. The first thing to be sure of, however, is what can and cannot be added to your compost bin.
In order to create really good, nutritious compost you need to add in a mixture of biodegradable food scraps and soil (just some dug up top soil from your garden is absolutely fine). To get you started, here’s a list of compost friendly garden and household waste items that you can add to your compost bin.
Compostable Materials:
- Tea Leaves
- Cardboard
- Crush Eggshells
- Coffee Grounds
- Vegetable Scraps
- Fruit Scraps
- Plant and Flower Clippings
- Grass Clippings
- Straw
- Shredded Newspaper
There are also certain foods that you need to avoid adding into your compost bin, as these will add absolutely no nutritional value to your compost and will also be incredibly hard for the microorganisms to process.
Non-Compostable Materials:
- Meat of any kind
- Bones
- Dairy products of any kind
- Onions
- Garlic
- Any fruit or vegetable peelings that have been treated with pesticides
- Pet manure
1 . Placement
Now that you have a better understanding of what organic materials you can and cannot compost, it’s time to think about where to place your compost pile.
Most compost bins will come with an open bottom, and this allows you to start building your compost on a bare patch of earth where existing microorganisms in that area can get ready-access to the materials.
However, if you have an outdoor space or courtyard that is totally paved over, you can also find compost bins that are sealed at the bottom and will keep everything confined. There are even some that can be placed underneath a kitchen sink, and these are perfect if you’d like to start composting but don’t have any outdoor space.
Contrary to popular belief, composting also doesn’t have to take up a lot of space in your garden, and even people with the smallest outdoor spaces can make their own compost with the help of a compact composting bin or worm composter.
2. Drainage
Once you’ve chosen the perfect space to start creating your compost, the next step is to make sure that there is adequate drainage laid down at the bottom. Straw is the best material for this, as it’s naturally compostable but will also ensure that no water sits and goes stagnant within your bin. If you cannot source any straw, then a layering of twigs and thin sticks will be just as good.
3. Add Layers
With your drainage laid down, now comes the fun part! Start adding in your organic, compostable materials as and when they come available to you. If possible, try layering wet and dry items alternately (a layer of vegetable scraps followed by a layer of cardboard, etc.) Although this isn’t absolutely necessary, it does help to speed up the composting process, so you’ll get that black gold in a much faster time!
4. Green Manure
Another really good additional layer for your compost heap in between layers of wet and dry is ‘green manure’. This comprises of materials such as grass clippings and fresh plant clippings, essentially anything that is freshly cut or mown from your garden. These are packed with absolutely loads of beneficial nutrients and these will all be returned back to your soil once the microorganisms have processed them.
5. Water
One thing that may surprise you about composting is that you actually have to water it from time to time. This helps to provide the microorganisms with the moisture levels they need in order to survive and function effectively. You don’t need to give it a soak, just a gentle spraying once a week will be fine, however you may want to do this more often if you live in a particularly hot region.
Likewise, if you live in an area that gets a lot of rainfall, you won’t need to water as often. And, if you’re using a bin to make compost, you can just remove the lid for half an hour and let the rainwater it for you.
6. Cover
Make sure that you remember to replace the lid however, as your compost will need to be covered at all times. This is much easier if you’re using a compost bin as it will likely have a lid intended exactly for this purpose, however if you’re creating a compost pile in a corner of your garden, sheets of cardboard or wooden planks will do the job.
You can also use plastic sheeting to cover your compost, however in the spirit of environmental friendliness it would be best to use a recyclable plastic or to reuse something that you no longer have any other need for.
The main purpose of covering your compost is to keep the moisture you’ve added into your compost within the pile itself, and it encourages it’s own formation of moisture that the microorganisms will produce. Covering your compost also prevents the rain from overwatering it and turning it into a slush or mud pile.
7. Turn
We’ve briefly touched on this during the explanation of stage two of how compost works, and as promised we’ll now go into this in further detail.
Turning your compost is potentially the most important thing you need to do in order to create a nutrient rich, healthy humus. By turning your compost, you’re providing the microorganisms with much-needed oxygen which helps them survive and in turn allows them to break down organic waste and create the compost.
It’s a fairly low maintenance task that only needs to be done every few weeks, and can be done by simply inserting a garden fork or a spade into the middle of the pile and flipping everything over. Some compost bins even include special turning handles, making the job easier than ever, and it’s a fantastic job to task a child with as well to help get them interested in the composting process.
8. The Finished Product
After a few months have passed and the microorganisms have done their job, you’ll begin to notice that your compost has now fully biodegraded into usable, nutrient-packed soil. It’s at this point that you can harvest it and put it back into your garden where it can be used for a wide variety of purposes.
Whether it’s improving your existing soil structure, being used as a natural fertilizer for your plants or helping to retain water in your pots and containers, there’s no gardening process that is more rewarding than creating your own black gold.
It can also be made all year round whenever you’ve got any suitable garden or household waste to add to your pile, so you’ll never have to worry about running out of compost or rationing it throughout the year. A constant supply of homemade compost will also save you a lot of money, as well as significantly reduce your carbon footprint.
TYPES OF COMPOSTING
The above process is how to create compost in the simplest way possible, and is known as ‘Onsite Composting’. However, there are actually a huge variety of other ways in which you can get your very own nutrient-packed, homemade compost, each of which is slightly different and may either be suitable for garden or for commercial needs. We’ve gone into some detail about each of these below.
1. Windrow Composting
Windrow composting is better suited for households and businesses that produce large volumes of organic, compostable waste, and more often than not is used as the method of composting food waste from entire communities of people.
This type of composting involves forming huge piles of organic waste into rows known as ‘windrows’, which are then periodically turned and aerated. Such is the volume of these windrows that this is ordinarily either done manually with an entire team of people, or by using heavy machinery.
In order to work effectively, each windrow needs to have a pile height of between 4’ and 8’, and have a width of 14’-16’. This allows enough heat to generate and for a consistent temperature to be maintained, but is still small enough to allow oxygen to flow to the core of each windrow.
Whilst this method of composting is definitely not the best for household composting, it is ideal for larger food manufacturers and for local authorities to compost organic waste from multiple households and businesses.
2. Aerated Static Pile Composting
This is a method of composting that produces the final product in a relatively short amount of time (usually somewhere between three to six months), and is more suited towards large amounts of homogenous materials such as grass clippings, plant cuttings and food waste.
Aerated static pile composting involves creating large piles of mixed organic waste which is not turned in the traditional way using a spade or fork, but instead is aerated through the addition of loosely piled bulking materials such as wood chippings or shredded newspaper. This allows air to pass from the top of the pile straight down to the bottom and creates air pockets within the compost that are essentially self-aerating.
Oftentimes aerated static pile composting involves a series of pipes and fans running throughout the compost as well which provide further aeration without need for turning, and whilst this is a low-maintenance way of providing oxygen it can also be a much more expensive setup.
With aerated static pile composting, the interior heat of the compost pile should not exceed the temperature of the outside layer, so this is something else you’ll need to check on from time to time, particularly during the winter months. It will also need placing in a shady area and covering during hotter weather to prevent moisture from escaping.
3. In-Vessel Composting
This is a way of composting larger amounts or organic materials but without taking up as much space as the windrow method. With in-vessel composting you feed your materials into a plastic drum, silo or concrete-lined trench and then manually turn it from time to time to ensure aeration.
The method itself is very similar to the onsite composting method, in-vessel composting gives you the opportunity to compost a much broader range of organic materials including meat, animal manure and biosolids. You also have a lot more control over the environmental conditions of the compost such as temperature and airflow as most in-vessel compost systems come with electrical controls that allow you to adjust the climate and the airflow.
This in turn also produces compost in a much quicker way than any other method, however you will still have to wait a few weeks after it’s been created to use it in order to allow microbial activity to balance and for it to cool to a suitable temperature before adding to your soil.
In-vessel composting containers come in a variety of shapes and sizes, which makes them perfect for both home and commercial use, and very little odor is produced using this method as well, which also makes it perfect for placing indoors. They are, however, quite expensive due to their technical properties and may also need to be installed by a professional.
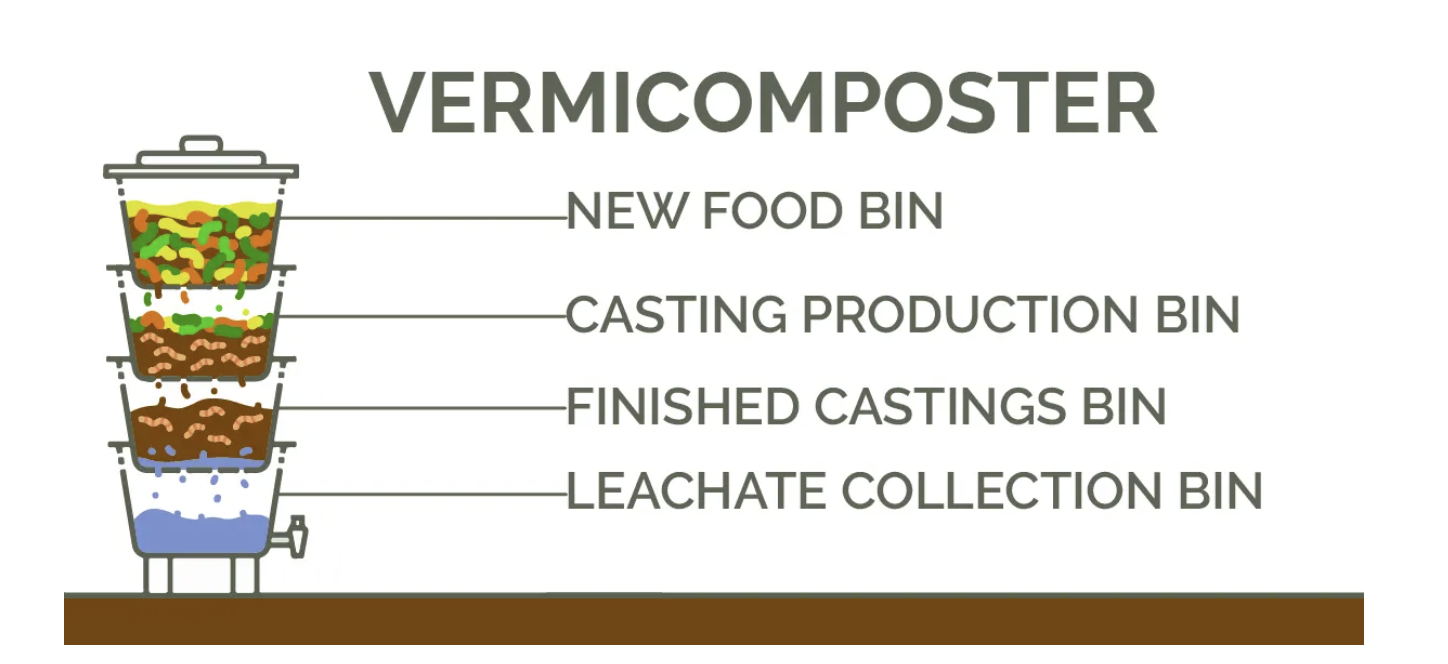
Vermicomposting
As well as the other composting methods we’ve listed above, you also have the choice of a method known as ‘Vermicomposting’. This process uses red worms rather than relying solely on microorganisms to create your compost, and these red worms break down the organic matter into a highly nutritious compost known as ‘castings’.
Created in worm bins, rather than in standard compost bins, one pound of red worms can collectively eat around half a pound of organic matter per day, which also makes vermicomposting a good choice if you’re looking for a way to make compost with a quicker production time. Whilst traditional onsite composting can take several months to get your final product, vermicomposting can provide you with castings in as little as three months!
Vermicomposting also has an additional benefit, as not only can the castings be used as potting soil or to improve your soil structure, but you can also benefit from it’s other byproduct which goes by the name of ‘worm tea’. This is also packed full of nutrients and can be used as a fertilizer for both garden and house plants.
You can compost everything you would ordinarily place into an onsite composting set up when you’re vermicomposting, and a worm bin also makes a better choice for anybody living in an apartment or a small business that’s looking to reduce it’s waste levels.
It is important, however, to keep the worms well fed and alive in order to create the castings, so it may not be the best choice if you only have occasional food scraps to add to your compost. Red worms are also extremely sensitive to changes in climate, and you’ll need to make sure that your worm bin isn’t placed anywhere that sees direct sunlight or extreme temperatures.
A temperature range of 55ºF to 77ºF is perfect for vermicomposting, which again makes it a perfect solution for anybody looking to compost but doesn’t have an outdoor space in which to do so.
WORM COMPOSTING 101
Whilst microorganisms play a very important part in producing your compost, you can also use worms to create compost that is packed with even more nutrients than those provided by bacteria alone.
Often the unsung hero of the gardening world, worms are able to work their way through organic materials in a super quick time as well and, best of all, they are almost totally odor-free! This makes worm composting, or ‘vermiculture’, the perfect choice for anybody looking to create their own compost but doesn’t have an outside space to do so. Simply pop a worm bin in your kitchen and you’re all set.
How to Build a Worm Farm
If this sounds like the ideal composting solution for you, take a look below at our step by step guide on how to set up your very own worm composting system.
1. Container
This one is pretty much a given, but you’re going to need a suitable container in which to house your new worm friends. There are a few options available to you here, from purposefully built worm bins to a simple plastic tub, but whichever you go for you need to make sure there are adequate air holes provided.
Generally speaking, worm bins that have been designed with vermiculture specifically in mind are usually the best option as they will be sturdy enough to keep your worms secure, allow you to feed organic materials into it without worrying about the weight, and will have the correct amount of air holes needed to keep your worms alive.
They also often have a faucet attached to the bottom, which gives you easy access to another byproduct of worm composting known as ‘worm tea’. This is packed full of minerals and is wonderful for using as a fertilizer on your plants.
2. Bedding
Just like all animals, worms like to settle down in a comfortable place to rest from time to time. But, believe it or not, worms actually love nothing more than a bed made from a combination of leaves, shredded wet newspaper and moist cardboard. And, whilst that probably doesn’t sound overly appealing to you, it’s a dream home for a happy worm.
Worms thrive in environments that contain around 75% water, but whilst it’s important to make sure that the bedding isn’t totally dripping wet. Just moist enough to be holding water but not having any excess run off of it is perfect.
Once the bed has been laid, be sure to cover it with a big scoop of earth as well, as this will help to retain the moisture levels and prevent it all from drying out. The bedding should cover about two-thirds of the entire bin, and it will need to be replaced every so often for odor control purposes. Replacing the bedding also creates new air pockets for the worms to move more freely around the bin.
3. Moisture
Keeping the moisture level correct within your worm bin is also incredibly important, as too little moisture will cause them to shrivel up and die, whilst too much moisture will see your compost production rate slow down significantly.
The best way to keep a consistent moisture level is to remove the lid every couple of days and gently spray some water (preferably harvested from an outdoor water butt) across the surface. Remember, also, that adding food waste increases the amount of moisture inside the worm bin, so add less when it’s fuller and a little more when necessary.
4. Add Worms
When it comes to vermiculture, your best bet is to use red worms (known scientifically as Eisenia Foetida), as they will produce compost at a really quick rate. To get a thriving population that will provide you with top-quality compost, you’ll need around 2000 of these cute little wrigglers, however, you don’t need to add that many at once!
Worms reproduce at a quick rate, and their numbers can easily double in just 90 days. So start off small and grow your population over time until you have an army of them that will make short work of turning your kitchen waste into nutrient-rich compost.
Adding your red worms to your worm bin is as simple as scattering them across the top of the surface and popping the lid back on. Their instinct to travel downwards into the dark, wet environment will immediately kick in and they’ll be in their bedding in no time.
5. Add Food Scraps
This really is as simple as just scattering a thin layer of food scraps across the surface of your worm bin and letting your worms do the rest. However, if you’re looking to accelerate the production of your compost, you can alternate between layers of food scraps and bedding.
Alternating layers also decrease the chances of odors building up, as does cutting the scraps down into smaller pieces which can then be composted in a quicker time by the worms.
What Can I Compost in a Worm Bin?
Worms have a pretty varied diet but, as with traditional composting, vermiculture has certain organic materials that are both suitable and unsuitable for adding into your worm bin. To help you make sure you’re getting it right, we’ve outlined these for you below:
Suitable for Worms:
- Any raw vegetables with the exception of onions, shallots, leeks, and garlic
- Any cooked vegetables including onions, shallots, leeks, and garlic
- All fruits except citrus peel
- Teabags
- Crushed eggshells
- Coffee grounds
- Breadcrumbs
- Shredded newspaper
- Shredded office paper
- Cardboard
- Garden waste
- Bear in mind that any fruits, vegetables, or garden waste that includes seeds may germinate within your wormery, so take care to dispose of the seeds beforehand.
Not Suitable for Worms:
- Raw onions
- Raw shallots
- Raw leeks
- Raw garlic
- Any peel from citrus fruits
- Glossy paper
- Dairy products
- All meat products including fish
- Grease
- Tougher garden materials such as wood and thicker stems can be placed in a wormery, however, they will take longer to compost.
Worm castings
The type of compost that worms produce is known as ‘worm castings’, and this is essentially worm manure that is absolutely packed full of nutrients that can be used to improve your garden soil and feed your plants. Not only that, but applying worm castings as mulch has also been shown to repel pests such as aphids and spider mites.
Another fantastic benefit of worm castings is that they also act as a natural slow-release fertilizer. This is due to the fact that they get coated with a protective layer of oil as they pass through the worm’s digestive system, and as this breaks down over time more of the nutrients are released into the soil.
There is a little bit of a waiting game to play before your worms start providing you with this amazing compost, however, it’s much quicker to arrive than regular compost and you can begin harvesting it in just four weeks from the first feeding.
How to Harvest Worm Compost
Harvesting your worm compost is relatively easy, and most worm bins are designed with a stacking tray system that allows the worms to work their way up through the bin whilst the finished compost falls to the bottom tray, which can then be removed and replaced at the top of the bin, whereupon the whole process can start over.
However, if your worm bin doesn’t have this feature or if you’ve made your own, there are a few different methods you can use to collect this black gold.
1. Manual Sorting
Whilst it is possible to sift through your worm bin and separate your wrigglers from their castings, it’s certainly the most tedious and perhaps the most difficult way of doing it. It’s also incredibly time consuming, but if you’ve got a free day and fancy getting familiar with your worms then this is a feasible method!
2. Bait Method
This method involves leaving your worm bin completely devoid of any food scraps for about a week and then putting in a large item that’s quick to decompose, such as a pumpkin or squash. This will bring all of the worms out of hiding as they’ll be drawn to the food and moisture it’s offering them.
Give it 24 hours, then when the worms are happily feasting on their food you can take the opportunity to skim off the top 4-6” of vermicompost.
This is also a really effective way of gathering your worms into one place if you’re changing the bedding or relocating them into a different worm bin.
3. The Light Method
Worms are light-haters and will do absolutely anything to bury themselves down into the dark. So to get them as deep into the worm bin as possible, and give you the opportunity to harvest the castings without any worms joining in for the ride, try the following steps:
- Scoop out some of the compost and pile it underneath a bright light
- Wait a couple of minutes as all of the worms you’ve picked up with the compost start traveling back towards the pile
- Gently scrape away the sides and top of the pile bit by bit to reveal the worms, and then place them back into the worm bin as they appear
- Repeat until you have as much vermicompost as you need
- What you’ll be left with is a pile of nutrient-rich worm castings to use in your garden without any risk of one of your worms being transported outside.
Raising Earthworms for Composting
The term ‘Earthworm’ covers a wide range of different worm species, including those that can be used for composting and not necessarily the ones you find wriggling around in your garden soil.
You’re likely using red worms for your composting needs and one thing you cannot forget is that you are looking after a living, breathing creature that (although needs very little maintenance) does require adequate care. This is even more important if you’re hoping to get good quality compost, as the happier the worms are the better the nutritional value of their castings will be.
There are five essential basic elements that worms require, each of which we’ve outlined below.
1. Moisture
A little known fact about worms is that they actually breathe through their skin, and this means that they need to be kept moist at all times. With that in mind, it’s super important that you keep the moisture levels within your worm bin at optimum levels, and that the bedding is kept as moist as possible without being soaking wet.
There is a fine line between too much and too little moisture in a worm bin as well, and getting the perfect balance is going to take a little trial and error. However, as a general guide the entire contents of the bin should have the same moisture consistency of a wrung-out sponge – just moist enough, but not drenched.
2. Warmth
Providing the optimal temperature for your worms won’t only help to keep them happy, but is also a good way to ensure they quickly breed and add more numbers to your composting population.
A temperature between 59ºF – 68ºF is perfect for red worms, and will also ensure that the moisture levels don’t dry out. Having said that, red worms are particularly hardy and can survive in temperatures up to 109ºF, however, there isn’t really any need for them to be kept at this temperature and it will certainly have a detrimental effect on repopulation rates.
3. Food
This isn’t going to be a problem if you’re using your red worms for composting, as they’ll be more than happy feasting on the consistent supply of kitchen waste and other organic materials that you’ll be putting in your bin.
However, whilst it’s true that worms will feed on kitchen scraps, it’s actually the microorganisms that are also feeding on the food waste that the worms are drawn to – they just happen to consume the food at the same time.
One good trick is to set up your worm bin with the moistened bedding and a scattering of food scraps a couple of days ahead of adding your worms in. This gives them a tempting food source right from the off, as the microorganisms will already be all over the food when your worms are setting up home.
4. Darkness
The fact that worms naturally live underground is a clue as to how much they love darkness. Prolonged exposure to sunlight can actually kill worms, so you need to make sure that they are under the cover of darkness for as much time as possible.
Your worm bin is most likely going to come with a lid that will help to block out most of the daylight, however, you can give them even more darkness but adding adequate layers of bedding that they can burrow down into.
Their hatred of daylight can occasionally work in your favor though, and you can keep them safely in your bin when you’ve got the lid off simply by shining a bright light over the top. This will cause them to dive back down into the depths and not even think about trying to escape!
5. Oxygen
The final essential care element for your worms is an adequate supply of oxygen. Even though they have one of the lowest oxygen requirements of any living creature, worms are still breathing organisms with anaerobic capacity.
Most worm bins come with air vents and holes already provided, however, if you’ve chosen to make your own, then you need to be sure that a good air supply can still reach your worms. Be particularly careful when using plastic as it doesn’t have the same natural breathability as other materials such as wood, and when making your air holes try not to be too eager, as too many can let it light and cause a reduction in moisture levels.
The addition of shredded paper and cardboard can also help to improve oxygen levels in your worm bin as they allow air to reach the inner zones of the compost, which is where the worms will spend most of their time.
COMPOSTING: TROUBLESHOOTING
As with all garden activities, you’re most likely to learn from your mistakes when it comes to composting. However, if you’re having particular difficulty with a certain aspect or feel like you need a little further advice, check out our troubleshooting guide below.
I’m not getting any compost from my organic materials
First of all – have some patience with it. Remember that compost can take months to fully process from the organic materials you’ve placed into your bin into the black gold you’re putting on your soil.
Make sure you’re turning your compost every few weeks as well. This is the single most important thing you can do to help with the process, as it allows air into the middle of the pile and helps the microorganisms perform more efficiently during the breakdown process.
If you have been turning it, then you may need to make sure your ratio of organic materials is right. Remember you need to have a mixture of green and brown waste, with kitchen waste only making up between 25%-50% of the pile. The remaining half needs to be dead material, cardboard or newspaper.
My compost smells bad
One of the most appealing things about compost is that it doesn’t have a bad odor, so if yours is starting to smell bad then it could be because you’ve been putting unsuitable materials (such as cooked foods or meat) onto it.
It could also be an indication that things have gotten a bit stagnant and there is too much water and not enough air within the pile. If this is the case, give everything a turn, add some shredded newspaper of cardboard and refrain from adding any green waste to it for a while. If it’s not in a bin with a lid, cover your compost pile with a plastic sheet and allow everything to stand for a couple of weeks.
Once the smell has gone, be sure to turn it more regularly to dry out the layers and prevent an unwanted build-up of moisture.
This article was originally posted on Simple Grow Soil.